


Table of contents
In this article, we’ll take a look at how much effort it takes to build an Android keyboard using code from the Android Open Source Project (“AOSP”), compared to using the keyboard SDK created by Fleksy. I dedicate this piece to all Android developers that want to build their own Android keyboard.
Introduction
In a comic, you know how you can tell who the arch-villain is going to be. He’s the exact opposite of the hero. ~ Unbreakable
If we imagine the topic of this article as a movie, the Latin input method editor (“LatinIME”) of the Android Open Source Project (“AOSP”) is without doubt the arch villain.
And guess who the hero is? Yes, that’s right – the Fleksy SDK! In all seriousness, by the end of this article, you’ll understand why as we demonstrate using both methods to build the software keyboard we desire.
The Latin IME Minefield
Many terrifying stories have been written on hundreds of websites about attempts to create a bespoke keyboard using the AOSP LatinIME codebase.
Some of the things are not true, such as the rumor that you need to compile an entire Android system from AOSP and that you cannot technically compile separate parts to make ad-hoc versions of components.
But many are 100% true.
Stories of programmers who went insane trying to compile and modify independent parts are almost certainly true.
Problems with the lack of documentation and the incompatibility between some Android Studio tools and those of AOSP, are some of the most common roadblocks encountered by those who brave the obstacle-filled adventure of using AOSP.
Building a Word Cloud
Our initial intention in this article was to build a keyboard that showed a word cloud of the most used words from a user. That was the very beginning of our adventure and you can imagine what happened next…
Imagine that the word cloud represents our real core business. I established a function to represent the resources available to my project:
Total resources = Resources to build a keyboard + Resources to build the core business
Latin IME implementation
We’ll start with the implementation based on the LatinIME keyboard from AOSP. This is a drama in two acts.
The first act is building the code downloaded from AOSP and the second is modifying it to create a simple word cloud with the most typed words by the user.
Act 1 – First compilation
We started with the latest Android Studio version available and the latest version of the LatinIME downloaded from here.
Right from the outset, upon opening the project we got our first Gradle error:
A problem occurred configuring root project 'LatinIME-refs_heads_android10-c2f2-release_v2'.
> java.lang.NullPointerException (no error message)

* Exception is:
org.gradle.api.ProjectConfigurationException: A problem occurred configuring root project 'LatinIME-refs_heads_android10-c2f2-release_v2'.
at org.gradle.configuration.project.LifecycleProjectEvaluator.addConfigurationFailure(LifecycleProjectEvaluator.java:94)
at org.gradle.configuration.project.LifecycleProjectEvaluator.notifyAfterEvaluate(LifecycleProjectEvaluator.java:89)
at org.gradle.configuration.project.LifecycleProjectEvaluator.doConfigure(LifecycleProjectEvaluator.java:70)
at org.gradle.configuration.project.LifecycleProjectEvaluator.access$100(LifecycleProjectEvaluator.java:34)
at org.gradle.configuration.project.LifecycleProjectEvaluator$ConfigureProject.run(LifecycleProjectEvaluator.java:110)
This error shows up because the gradle files from AOSP uses some old versions of Java Development Kit (JDK), but you can use the latest ones:
In Android Studio: Build → Execution → Deployment → Build Tools → Gradle and change Gradle JDK to version 11.
Change build.gradle:
classpath 'com.android.tools.build:gradle:3.2.0-beta03'
to
classpath 'com.android.tools.build:gradle:7.0.3'
After that, we got the following message:
Minimum supported Gradle version is 7.0.2. Current version is 4.6.

Please fix the project's Gradle settings.
Change Gradle version in Gradle wrapper to 7.0.2 and re-import project
Open Gradle wrapper properties
Gradle Settings.
→ Click on “Change Gradle version in Gradle wrapper to 7.0.2 and re-import project”
AOSP uses “.bp” files. These files are the build configuration files for Soong and replace the usual “.mk” files. It’s at least strange that the gradle files we download from AOSP reference to “mk” files that don’t exist but not these “bp” files.
We should create these “mk” files where the “bp” files are, in the root and in the “native/jni” folders. They are really simple “Android.mk” files with this instruction:
include $(call all-subdir-makefiles)
The last change: Add a “gradle.properties” file in the root directory with the following content:
android.useAndroidX=true
android.enableJetifier=true
At this point, the code can be built and we can install it on the emulator. You’ll see an error telling you that the principal activity can’t be launched. This is normal, remember that you are building a keyboard and not a regular application. If you downloaded the latest LatinIME version from AOSP, it already provides an empty Activity.
In any case, our keyboard is installed. For debugging it in the emulator, go to settings→languages & input→[our keyboard name]. From Android Studio you’ll be able to “attach to process”.
If you place a breakpoint in the “create” method of PreferencesSettingsFragment and go to the keyboard preferences in the emulator, you’ll hit this breakpoint.
Act 2 – Modify the current code to add a new feature
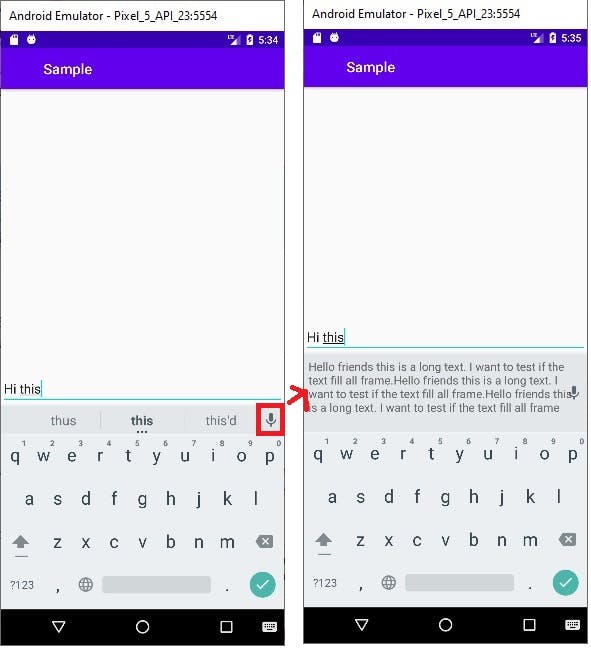
We want to add to the existing basic features by opening a new frame above the keyboard that will display the word cloud and provide a way to intercept words as the user types.
Create a frame above the keyboard
Looking at the existing project layouts, you’ll discover one named main_keyboard_frame.xml. This is the layout used by the class MainKeyboardView. Perfect! It seems simple, we add a new view to the upper part where we will show the word cloud:
<com.android.inputmethod.latin.suggestions.User1View
        android:id="@+id/user_view"
        android:layoutDirection="ltr"
        android:layout_width="match_parent"
        android:layout_height="80dp"
        android:gravity="center_vertical"
        style="?attr/suggestionStripViewStyle" />
It works!

However, I noticed strange things happening, it seems that the view we just added hides the application text field. The scroll of the foremost application is not working properly.
Also, some events are not being handled properly in our new view as it is not part of the keyboard. If we click on it, the keyboard hides away, as if we clicked in the application.
It seems we need another approach. Looking at the layouts again, there is a SuggestionStripView view inside the main_keyboard_frame. This view is used to show the word suggestions as the user types. This view pushes the application text view correctly and handles the events correctly.
The idea is to transform this SuggestionStripView into an element that can handle different use cases so we can use it to show the word suggestions or make it bigger to show our word cloud when needed.
We can find the layout suggestions_strip.xml. Here we can add our TextView class just below the first component:
<merge
    xmlns:android="http://schemas.android.com/apk/res/android">
    <!-- Provide audio and haptic feedback by ourselves based on the keyboard settings.
         We just need to ignore the system's audio and haptic feedback settings. -->
    <LinearLayout
        android:id="@+id/suggestions_strip"
        android:orientation="horizontal"
        android:layout_width="match_parent"
        android:layout_height="40dp"
        android:layout_marginLeft="@dimen/config_suggestions_strip_horizontal_margin"
        android:layout_marginRight="@dimen/config_suggestions_strip_horizontal_margin"
        android:hapticFeedbackEnabled="false"
        android:backgroundTint="#ff0000"
        android:soundEffectsEnabled="false" />
        <TextView
            android:id="@+id/text2"
            android:layout_width="match_parent"
            android:backgroundTint="#ff0000"
            android:padding="6sp"
            android:textSize="16sp"
            android:layout_height="match_parent"
            android:visibility="invisible"
            android:text="Hello friends this is a long text. I want to test if the text fill all frame.Hello friends this is a long text. I want to test if the text fill all frame.Hello friends this is a long text. I want to test if the text fill all frame"
          />
    <!-- Provide audio and haptic feedback by ourselves based on the keyboard settings.
         We just need to ignore the system's audio and haptic feedback settings. -->
    <!-- Provide audio and haptic feedback by ourselves based on the keyboard settings.
         We just need to ignore the system's audio and haptic feedback settings. -->
    <LinearLayout
        android:id="@+id/important_notice_strip"
        android:orientation="horizontal"
        android:layout_width="match_parent"
        android:layout_height="40dp"
        android:layout_marginLeft="@dimen/config_suggestions_strip_horizontal_margin"
        android:layout_marginRight="@dimen/config_suggestions_strip_horizontal_margin"
        android:hapticFeedbackEnabled="false"
        android:soundEffectsEnabled="false" >
        <TextView
            android:id="@+id/important_notice_title"
            android:layout_width="match_parent"
            android:padding="6sp"
            android:textSize="16sp"
            android:layout_height="40dp"
            style="?attr/suggestionWordStyle" />
    </LinearLayout>
    <ImageButton
        android:id="@+id/suggestions_strip_voice_key"
        android:layout_width="@dimen/config_suggestions_strip_edge_key_width"
        android:layout_height="40dp"
        android:layout_alignParentEnd="true"
        android:layout_alignParentRight="true"
        android:layout_centerVertical="true"
        android:backgroundTint="@color/typed_word_color_lxx_dark"
        android:contentDescription="@string/spoken_description_mic"
        style="?attr/suggestionWordStyle" />
</merge>
Now, we can intercept the click event in the SuggestionStripView class to show our new view when the speech recognition button is clicked:
@Override
public void onClick(final View view) {
    AudioAndHapticFeedbackManager.getInstance().performHapticAndAudioFeedback(
            Constants.CODE_UNSPECIFIED, this);
    if (view == mImportantNoticeStrip) {
        mListener.showImportantNoticeContents();
        return;
    }
    if (view == mVoiceKey) {
        // Clickbutton
        if(mText2.getVisibility()==VISIBLE) {
            ViewGroup.LayoutParams params = getLayoutParams();
            params.height = 110;
            setLayoutParams(params);
            mText2.setVisibility(INVISIBLE);
            mStripVisibilityGroup.showSuggestionsStrip();
            mode = 0;
        }
        else{
            ViewGroup.LayoutParams params = getLayoutParams();
            params.height = 300;
            setLayoutParams(params);
            mText2.setVisibility(VISIBLE);
            mStripVisibilityGroup.hideSuggestionsStrip();
            mode = 1;
        }

        return;
    }

    final Object tag = view.getTag();
    if (tag instanceof Integer) {
        final int index = (Integer) tag;
        if (index >= mSuggestedWords.size()) {
            return;
        }
        final SuggestedWordInfo wordInfo = mSuggestedWords.getInfo(index);
        mListener.pickSuggestionManually(wordInfo);
    }
}
This new code changes the size of the SuggestionStripView frame. To tell the class StripVisibilityGroup which elements should be shown, we need to modify the following method:
public void showSuggestionsStrip() {
    if(((SuggestionStripView)mSuggestionStripView).mode == 0) {
        mSuggestionsStrip.setVisibility(VISIBLE);
        //          mSuggestionsStrip.setVisibility(INVISIBLE);
        mImportantNoticeStrip.setVisibility(INVISIBLE);
    }
 }
And add the following method:
public void hideSuggestionsStrip() {
    mSuggestionsStrip.setVisibility(INVISIBLE);
    //          mSuggestionsStrip.setVisibility(INVISIBLE);
    mImportantNoticeStrip.setVisibility(INVISIBLE);
 }
By trying to do this without any kind of documentation, I spent countless hours adding breakpoints and studying the code that made parts of the SuggestionStripView visibles or not visible. It was frustrating to say the least.
Intercept words
We want to intercept each word typed by the user or selected from the suggestion list.
For this, we use our intuition and by looking at the available classes, we discover the InputLogic class. The code of this class starts with:
/**
 * This class manages the input logic.
 */
This seems to confirm our intuition. Next, we need to study each method of this class until we find commitChosenWord. We use this method to send each word from this class to our view:
private void commitChosenWord(final SettingsValues settingsValues, final String chosenWord, final int commitType, final String separatorString) {
    long startTimeMillis = 0;
    if (DebugFlags.DEBUG_ENABLED) {
        startTimeMillis = System.currentTimeMillis();
        Log.d(TAG, "commitChosenWord() : [" + chosenWord + "]");
    }

    Log.d("customk", "commitChosenWord() : [" + chosenWord + "]");
    mLatinIME.SetTextToView(chosenWord);
…
It’s not the cleanest solution, but we add the SetTextToView method to the principal controller class (LatinIME):
public void SetTextToView(String text)
{
    mSuggestionStripView.SetTextToView(text);
}
And finally, we add the same method to the SuggestionStripView class:
public void SetTextToView(String text)
{
    Log.d("customk", "SuggestionStripView::SetTextToView() : [" + text + "]");
}
A couple of tests later, I noticed that it’s not that simple. This method fails in the following cases:
- Copy text from another application and then paste it in the TextView when our keyboard is active, the full text is considered a word. What a misleading name for the commitChosenWord method!
- Using a physical keyboard instead of our keyboard. Nothing gets to this method.
Latin IME conclusion
I spent so many hours creating my keyboard that I blew all the budgeted time investigating and building the keyboard itself. I didn’t have any time left to build my core business.
The lack of any documentation and using a codebase that is almost 7 years old meant that the whole process took ages and wasn’t very successful. The final result was not a good implementation, it was like hacking, but without the fun!
If we think about the resource function, using the LatinIME it can be rewritten as:
Total resources = Resources to build a keyboard
Other negative points against using LatinIME:
- If we want to add our business logic to the application instead of the keyboard, we should plan it carefully. We should add our keyboard as a service inside our app and do some kind of interprocess communication. If we add our logic inside the keyboard, we should be very careful about the performance impact of this. Adding any kind of multithread processing to this codebase is not a trivial task.
- There is a native part written in C++. If we need to modify anything from there, we need to have a strong knowledge of C++ and generate different versions of it for each different architecture. Anyway, porting this code to iOS is not something I want to be involved in.
- There is no swipe typing or gestures inside LatinIME. There are some implementations you can try from GitHub. Good luck with that.
- Language support is another concern I have. As the name suggests, this keyboard is for latin languages, or languages that use a latin script. If we want to support Japanese, Korean, Chinese etc, we should look into other projects inside AOSP and repeat the same process we did (and maintain all the variants).
Hopefully by now it is clear that this approach is far from ideal and can become costly, very quickly – both in terms of time and money.
Using Fleksy SDK
Implementation with the Fleksy SDK
Luckily, the hero has arrived when my brain really needed it.
The Fleksy SDK is like a breath of fresh air compared to wrestling with LatinIME.
We received the SDK and the documentation from Fleksy. In this case, we created a SampleKeyboardService class that inherits the KeyboardService of the SDK. This class will be the link with the keyboard.
The core of our business will be inside our application. It won’t be mixed together with the keyboard code, which happened with LatinIME. Finally, we can use Kotlin as the programming language.
We read in the documentation about a procedure for adding a frame to the upper part of the keyboard.
We just needed to add the following imports to our application:
import co.thingthing.fleksy.core.keyboard.PanelHelper.hideFrameView
import co.thingthing.fleksy.core.keyboard.PanelHelper.showFrameView
And we can use the following methods:
showFrameView(text_view): For adding a view in the upper frame.
hideFrameView(): For hiding the upper frame
To capture the words typed by the user or when clicking in the suggestion bar, we can follow the documentation and only need to make a minor change to the configuration of the SDK:
monitor = MonitorConfiguration(
            extractionMode = ExtractionMode.AGGREGATE,
            composing = true,
            input = false
        )
And subscribe to the event that allows us to receive the activity from the user:
eventBus.monitor.subscribe {
    when (it) {
        is ComposingExtraction -> AddWord(it.text.toString(),it.start,it.end)
    }
}
Finally, we create a property _previous_word and init we use a new AddWord method
public var _previous_word:String = ""

public fun AddWord(tword:String,start:Int,end:Int)
{
    Log.d("DEBUG_FLEKSY", tword + " " + start + " " + end)
    if(end==start+1){
        if(_previous_word!="") {

            val pword = _previous_word.toLowerCase()
            if (pword == "hello") {
                showFrameViewApp()
            } else if (pword == "hide") {
                hideFrameViewApp()
            }
        }
        else{
            _previous_word = ""
        }
    }
    else{
        _previous_word = tword
    }
}
And hey presto, it works in all the cases where the commitChosenWord from the LatinIME wasn’t working.
How simple and quick is that compared to the arduous journey of trying to use LatinIME?
Fleksy SDK conclusion
The Fleksy SDK allows your developers to keep a strong focus on your core business – period.
This means that the function I presented at the very beginning can be reformulated as:
Total resources = Resources to build the core business
What do you think? Let us know or start building with the Fleksy SDK!